Essential Tools and Pre-Installation Planning
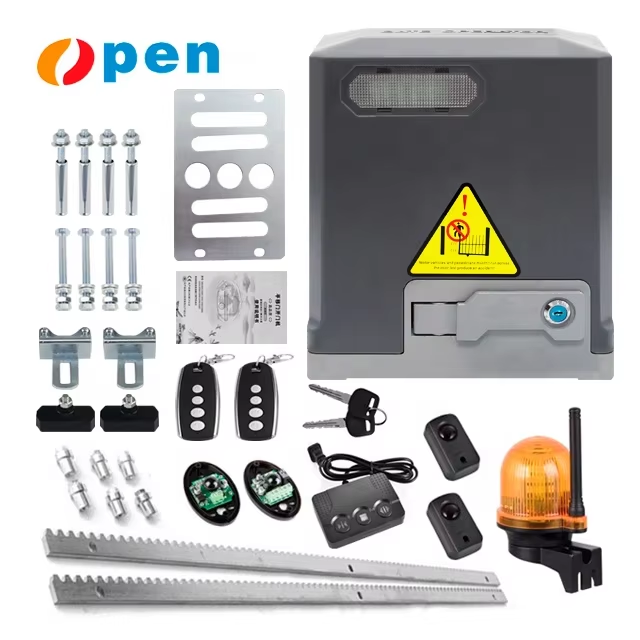
Required Tools for Sliding Gate Opener Kits
Getting the job done right when installing a sliding gate starts with having the proper tools on hand. Wrenches come in handy for tightening bolts, while screwdrivers handle those tricky fasteners. A good drill makes short work of mounting brackets, and don't forget the level it's what keeps everything straight and prevents those frustrating wobbles later on. Safety first folks! Gloves protect hands from sharp edges, goggles keep debris out of eyes during cutting or drilling, and a hard hat should be worn if working near overhead structures. Cheap tools just slow things down and often break at the worst possible moment. Spend a bit extra on quality gear from reputable brands. Those few extra bucks upfront mean fewer headaches down the road when dealing with misaligned components or struggling with stripped screws in the middle of installation.
Assessing Your Gate's Compatibility
Getting a sliding gate opener starts with checking if your current gate works well with one. Measure both the width and height first just to get a good idea of what kind of opener might fit. The material matters too – wood gates behave differently than metal ones when it comes to automation. Heavier gates definitely need stronger openers, so don't assume any old model will work. Manufacturers usually have specs listed somewhere on their websites or packaging, so take time to look those over before buying anything. Skipping this step can lead to all sorts of problems down the road, from broken parts to complete system failure. A little research upfront saves headaches later on during installation.
Choosing the Right Automatic Sliding Gate Opener
Types of Electric Sliding Gate Openers
Picking out the correct electric sliding gate opener makes all the difference when it comes to how well the system works day after day. The market offers three main options these days: chain driven models, belt driven units, and those powered by solar panels. Chain driven systems generally cost less upfront and handle heavy duty gates pretty well, which is great if budget matters most. But let's face it, nobody wants that loud clanking noise every time someone enters or leaves. Belt driven versions run much quieter and move gates smoothly without all that racket, so neighborhoods appreciate them a lot. That said, expect to pay extra for this convenience factor. Solar powered openers have become quite trendy lately because they save money on electricity bills over time. Still worth noting though, their performance depends heavily on getting enough sun exposure where installed. Homeowners in sunny regions might find them particularly appealing while others could struggle during cloudy seasons.
Weight Capacity and Motor Specifications
Getting to grips with weight limits and motor specs matters a lot if we want our sliding gates to work properly over time. When gates get overloaded, all sorts of problems pop up - motors tend to break down faster, for starters. To pick the right motor, someone needs to figure out how heavy the actual gate is plus how often it will be opened and closed throughout the day. Most folks who know what they're talking about suggest going for high torque motors when dealing with heavier gates because these motors give that extra push needed to get things moving without struggle. The torque rating really makes a difference here. It affects not just how fast the gate moves but also whether it keeps working reliably month after month. Speaking from experience, getting advice from people who install these systems regularly tends to save headaches later on since they've seen all kinds of situations and can spot potential issues before they become expensive repairs.
Solar vs. Hardwired Power Options
Choosing between solar powered and hardwired sliding gate openers needs careful consideration of what works best for each situation. The solar models run on renewable energy which cuts down on electricity bills in the long run, though they need plenty of sun to function properly. Hardwired gates tend to be more dependable day after day but come with bigger price tags because running wires through property isn't cheap work. Some folks report saving around half their energy expenses switching to solar instead of regular electricity. For installation, hardwired systems need to stay close enough to existing power lines, whereas solar panels must sit where they get good sun throughout most of the day. Location matters a lot here, especially if trees or buildings cast shadows at certain times.
Step-by-Step Sliding Gate Opener Installation
Preparing the Track and Concrete Foundation
Getting ready before putting in a sliding gate opener matters a lot. The track needs prep work and a good concrete base underneath. Without proper leveling and strength, gates just won't move right or stay safe over time. First things first, measure out where everything goes on the ground. Clear away any rocks, sticks, or dirt from the path so nothing gets stuck when the gate slides back and forth later. Picking the right concrete mix depends on how heavy the gate actually is going to be. Some folks skip this part and regret it later. Let the concrete cure properly too. Most bags say wait at least two days, sometimes longer depending on weather conditions. Rushing this step can lead to cracks forming down the road.
Mounting the Sliding Gate Motor
Getting the sliding gate motor mounted right matters a lot during installation. Start collecting all the stuff you'll need first - basic tools like a good quality drill, something to check levels, plus whatever mounting pieces came with the motor box. Read through those manufacturer guidelines carefully when placing the motor relative to the track system. The whole thing needs to be level if we want smooth gate movement later on. Fasten everything down securely with bolts and brackets, double checking that nothing feels loose or wobbly after tightening them up. Safety comes first though! Put on gloves and eye protection before starting work, and never forget to turn off electricity at the breaker panel while doing any electrical connections. Accidents happen when folks rush through these steps without proper caution.
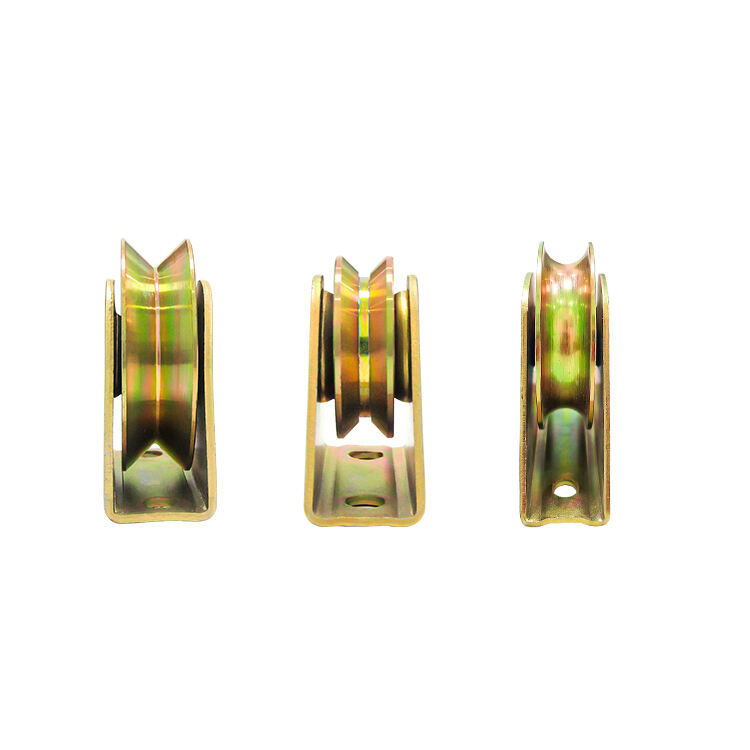
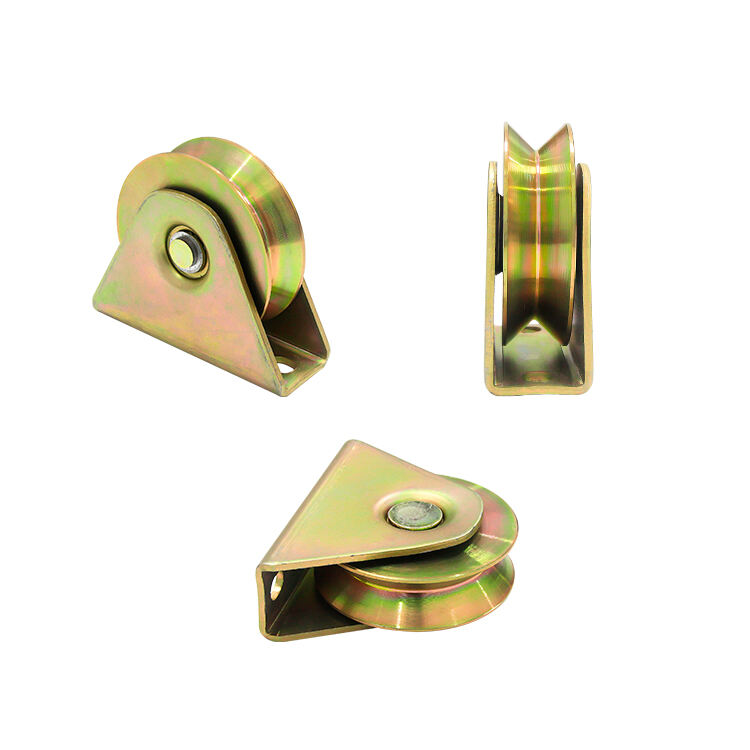
Attaching Cantilever Gate Components
Getting those cantilever gate parts attached right matters a lot for how well the gate works and stays safe over time. First thing to do is figure out where everything goes on the gate frame. Look at pictures online or ask someone who's done this before if possible. One big no-no folks make? Misaligned parts. That just causes headaches down the road when trying to open or close the gate properly. Make sure every bolt feels snug against its spot and lines up nicely with both the gate body and the track it slides along. Don't forget to check manufacturer guidelines too. Most kits come with step-by-step manuals these days. Combine those with some hands-on advice from experienced installers and chances are much better that nothing gets messed up during setup. The result? A solid sliding gate system that won't give trouble for years.
Wiring and Automation System Setup
Connecting Power Sources Safely
Safety should be the top priority when installing a sliding gate opener. Always follow basic safety rules first things first. That means getting those circuit breakers installed right and making sure everything is properly grounded so there aren't any electrical risks involved. Before starting work, figure out what kind of power supply we're dealing with here AC current or maybe solar panels and check if the equipment will actually work together. Diagrams really help with these kinds of installations they act as guides through what can otherwise feel like a maze of wires. Don't forget to look at local building codes too. Most areas have specific requirements about electrical installations. Check the circuit's amperage rating carefully and make certain all wire connections are enclosed properly. Moisture damage or someone accidentally touching exposed wires could cause serious problems down the road. A little extra time spent on these details now saves headaches later on.
Programming Remote Controls and Access Systems
Getting those remotes programmed properly makes all the difference when setting up a sliding gate system. Start by looking at what the manufacturer says in their manual about pairing the remote with the gate opener so everything works smoothly. Want better security? Look into adding things like keypad entry or an intercom system that gives multiple layers of protection. When something goes wrong, most problems come down to simple fixes first check if the batteries need replacing and make sure nothing is blocking the signal between devices. Also worth knowing about frequency settings since these can sometimes cause interference issues. For folks who want even more control, there are smartphone apps available now that let people manage their gates remotely from just about anywhere they happen to be.
Safety Testing and Maintenance Best Practices
Installing Photobeam Safety Sensors
Photobeam safety sensors really matter when it comes to stopping accidents and keeping sliding gates operating safely. They work by spotting anything blocking the gate's path and then stopping or reversing the gate movement whenever something gets in the way, whether it's a toy left on the driveway or someone trying to cross while the gate is closing. Installing these things isn't rocket science but does require attention to detail. Start by placing one sensor on each side of the gate where there's nothing obstructing the line of sight between them. Getting them aligned properly is super important here, so grab a spirit level and take your time with this step. Proper installation means meeting all those safety codes for both homes and businesses, which gives property owners confidence knowing they're following the rules while protecting people from potential harm.
Lubricating Heavy-Duty Sliding Mechanisms
Keeping those heavy duty sliding parts well lubricated makes all the difference when it comes to getting smooth movement out of sliding gates day after day. When picking out what kind of lube to use, most folks go with either silicone based stuff or lithium grease since both hold up pretty well against rain, snow, and extreme temperatures. A good rule of thumb is to give those moving parts a fresh coat around twice a year, maybe spring and fall. Industry pros generally agree on this schedule because it helps prevent the kind of grinding and sticking that happens when gates get neglected. Without regular maintenance, even the best designed gates will start showing signs of wear much sooner than expected.
Troubleshooting Common Operational Issues
Many sliding gate owners run into trouble at some point, and learning basic fixes can really cut down on repair costs and downtime. Common headaches tend to be gates that won't budge, operate too slowly, or just stop mid-motion. Most of these problems usually get sorted out by looking for things blocking the path or sensors that have gotten misaligned somehow. When DIY approaches fall short though, calling in a pro makes sense rather than risking damage. People who've dealt with similar situations report all sorts of workarounds they discovered through trial and error, which helps others figure out what might be going wrong. The bottom line? Don't hesitate to bring in experts if things aren't working properly after basic checks, since proper maintenance keeps gates running smoothly and safely over time.